
Growing Tomatoes
The modern cultivated tomato originated from wild relatives in the mountainous regions of South America. It was in pre-Columbian Mexico that the tomato was domesticated before being taken to Spain as an ornamental plant. It wasn’t initially grown as a vegetable because it was believed to be poisonous. Tomatoes were adopted as a food crop first in Southern Europe, and later (19th century) in Northern Europe and the US1. Tomatoes are a popular and welcome addition to any home garden, and one of the easiest vegetables to grow. They require a little more skill in the low desert of Arizona, due to hot temperatures in summer and occasional freezes in winter. This desert region allows two short growing seasons, which means double the opportunity for delicious tomatoes.
Varieties
There are many kinds of tomatoes to choose from, each with characteristics for specific growing environments. when choosing a variety, it is important to identify the characteristics that will make tomatoes successful in the low desert. Taking a moment to go over some important terms will make it easier to understand how to choose the right tomato.
Types of tomatoes can be referred to as cultivar or variety, but these terms mean different things.
- Cultivar, or cultivated variety, is a plant that has distinctive characteristics, due to propagation practices, such as cutting or hybridizing selected plants.16 These are often propagated for specific characteristics, such as growing well in containers, low acidity, or shelf-stability. Many tomato cultivars available to home gardeners are hybrids.
- Hybrids can be created by a breeder crossing two different parent plants together to get desired characteristics. This also occurs in nature during cross-pollination, eventually leading to new species. hybrids will offer characteristics, such as disease/pest resistance, container-friendly, well-suited to greenhouse/high tunnel, and high yield. Hybrid will be noted on front of seed packet.
- Variety is the natural development of a species without the aid of humans. Tomatoes that have been grown over time in a specific geographical area are varieties that are well-suited to that location.
- Heirloom is an open pollenated (by wind and insects) variety that has been grown and shared for many years in a specific place before commercial hybrids were developed beginning in the 1950s. Heirlooms are often known for great flavor, but sometimes lack resistance to disease. Plants grown from saved heirloom seed will produce the same tomato when isolated from other tomatoes.
- Genetically modified (GMO) seeds have been developed with certain characteristics in mind but have not been available to the home gardener until recently. In January 2024, the first GMO tomato variety was made available to home gardeners. The Purple Tomato is the first ever GMO vegetable seed available for purchase to home gardeners. Historically, GMO seeds have been exclusively available to large scale commercial growers who are under contract agreements with the developing seed company. These seed companies do not supply their product to home gardeners or to garden supply stores.7
There are two different growth habits of tomato plants for the home gardener to choose from: indeterminate and determinate. Growth habit, days to harvest, and yield differentiate these tomato varieties.2
Indeterminate tomatoes grow and produce fruit all season. This extended harvest is heavier, but slower to mature than determinate varieties. If space is unlimited, indeterminate tomatoes are a good option to provide fresh fruit throughout the season. Indeterminate tomatoes can become sprawling plants, so are best supported by cages or stakes. Determinate tomatoes are more compact plants that grow to a certain height before flowering and setting fruit that ripens nearly at once. This is a good option for gardeners who want to preserve the fruit. Determinate tomatoes are an excellent choice for gardeners that have limited space. These plants can be grown in containers on patios, or in small garden spaces with support.
Look for terms, such as, heat tolerant, early, cherry, grape, and plum. These terms will be listed on websites/catalogs and on the packaging. Time to maturity or harvest is a very important piece of information listed on the front and/or back of the seed packet. This will be stated as the number of days from transplanting or days to maturity. This number tells you the minimum amount of time required for fruit to be produced. Early maturity dates (45 to 70 days) are the best suited to the two short growing seasons in the low desert of Arizona.
Before selecting tomatoes or any vegetable varieties for the home garden, consider:
- Climate (choose arid friendly varieties)
- Intended use like eating fresh, drying or canning
- Desired amount of fruit
- Gardening space available such as containers, raised beds or in-ground planting
- Starting from seed vs purchasing seedlings
- Using determinate (fruit all at once and then stop producing) or indeterminate (grow and produce fruit all season) varieties
Larger fruiting, long season tomato varieties are often unsuccessful in the lower elevations of Arizona because of the shorter growing season, hot temperatures, and dry conditions. Cherry and plum tomato varieties that grow quickly (45 - 80 days) can be very productive. If the gardener wants to try a new variety, we recommend doing so alongside a known variety to enjoy a guaranteed harvest. Gardeners can choose between heirloom or hybrid varieties, each having their own benefits.
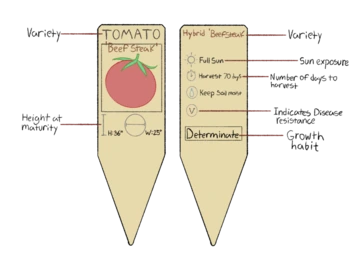
Disease resistance is another characteristic that will be listed on the seed packet. Diseases will be present depending on the specific region of the country. Letters on the seed packet and seedling label will indicate resistance to specific diseases. These indications could be as follows: V (Verticillium wilt), T (tobacco mosaic virus), F (Fusarium wilt), L (Septoria leaf spot), or N (nematodes). Listed below is an example tomato seedling tag with important information designated. Similar information will be included on seed packets.
Nutritional benefits
rease fresh fruit availability as well as the availability of important nutrients in your diet. Tomatoes are rich in folate, potassium, and are a good source of antioxidants, including vitamin C and beta carotenoids, specifically lycopene.3 Folate is an important nutrient to have throughout the lifecycle for the creation of genetic material and to aid in healthy cell division.4 Potassium is important in the proper functioning of muscles and organs, including the heart and kidneys.5 Lycopene has been associated with decreased risk of some cancers including prostate, lung, uterine and breast cancer and lowered blood pressure, among other health benefits.6 Tomatoes do not need to be eaten raw to retain their nutrients; cooked and canned tomatoes remain high in nutrient content and offer even more bioavailability (the body’s ability to absorb nutrients) of lycopene.7
Storage
Tomatoes are best stored outside of the refrigerator when they will be eaten fresh, to preserve the taste and texture. Store in an open container or on a countertop in a cool place out of direct sunlight. They can be frozen for later use, with or without blanching, in a tightly sealed container. Though tomatoes are safe to eat from the freezer for many years, their quality will degrade in eight months to one year. If canning tomatoes or tomato sauce products, use up to date recipes from reputable sources, such as United States Department of Agriculture (USDA). Current guidelines require adding citric acid or bottled lemon juice to tomato products before canning, but the amount of acid may increase, so make sure to use an up-to-date recipe or call your local Cooperative Extension office.
Number of plants
Just eight plants, two per person, will supply a family of four with fresh tomatoes all season. If planning to preserve fruit for the winter, increase the number of plants to 16, or four plants per person.
Starting from seed
Starting tomatoes from seed offers some advantages. There are more choices in the cultivars available than purchasing potted seedlings. The cost is much lower, especially if using saved, traded, or gifted seeds. Using recycled food safe containers can also reduce seed starting costs.
- Recycled: milk cartons, yogurt cups, water bottles, saved and sterilized garden center pots
- Disposable: toilet paper tubes, homemade newspaper pots, soil blocks
- Purchased: seed trays and pots (reuse and clean these next season)
When choosing a growing medium for planting seeds, keep in mind that potting soil and compost can be too dense and rich for seeds to germinate, and can slow growth. Using garden soil risks the introduction of diseases or pests to new seedlings. Instead, use a good quality, purchased seed starting mix that has been pre-moistened.
Purchased seedling mixes can be very dry, and it may be difficult for the material to absorb water. Rather than risk seeds floating out of the container along with added water at the time of planting, add moisture at least a day ahead of planting. To do this, simply add the seedling mix to a container, such as a bucket, and gradually add water while mixing by hand. The mixture should be wet, but not soggy. Cover the container until the next day, at which time, the water should be adequately absorbed.
Make your own seed starting mix
- 1 part coco coir (We don’t recommend sphagnum peat moss as it isn’t a sustainable product)
- 1 part perlite
- 1 part vermiculite
Make ½” holes with a small dibber or blunt pencil and sow two seeds in each hole. Cover seeds with soil and put in a warm location (no less than 60°F at night) with a minimum of 12 hours of balanced sunlight each day. Grow lights ensure consistent light for growing robust seedlings.
Optional: Grow light systems can be expensive, so consider using basic fluorescent (T8) lights. This is the simplest and most affordable way to start healthy seedlings at home. “Shop lights” with two T-8 bulbs can be suspended at a close distance above seedlings.8
Keep seeds moist, but not wet. Seeds will germinate within 7 to 10 days. Cover newly planted seeds with a humidity dome or clear plastic to keep soil from drying out between watering. Make sure to remove cover as soon as seedlings emerge to avoid dampening off. Although not necessary, a heat mat is a good choice for fast and even germination. Soil temperatures between 70-75°F are best for germination.
Once seedlings emerge, ensure they have adequate light to avoid leggy plants. Choose the more robust of the two seedlings in each pot, pinching out the weaker one. Once the seedlings are at least two inches and have at least three true leaves, they will benefit from some added nutritional support. An excellent choice is a dilution of fish fertilizer or seaweed extract. Another option is to water with a fertilizer solution made of one teaspoon houseplant food in one gallon of water, or use a balanced fertilizer at half strength.
Seedlings will be ready to transplant outside in 6 to 8 weeks, when 6” tall.
Harden off seedlings
Seedlings have developed indoors, protected from direct sun, temperature differences, and wind. An important step before transplanting outside is to “harden off” the seedlings. Hardening off is a process of gradually exposing seedlings to these outdoor elements to prepare them for the transition and avoid the risk of transplant shock or injury. A week before transplanting outdoors, place seedlings in a sheltered location for a few hours each day. Over the course of the week, increase exposure time and the amount of direct sun.
Choosing a healthy plant
Choose a good quality plant that is at least six inches tall with full leaves of a rich, green color, starting low on a strong stem. Flower buds can be present, but not yet open, and new growth visible at the tips. Nurseries sell smaller plants in 6 or 8 cell packs, as well as larger single plants. The single plants are older, and more established, at a higher price. Smaller plants can be purchased and up potted at home in a sheltered location for a head start (3 or 4 weeks) until the weather warms for planting outside.
Plants that are leggy, root bound (roots visible through pot bottom), or have discoloration (indicating nutrient deficiency) should be avoided. Check for insect damage and infestation before taking them home, so as not to import pests into the home garden. Also check the label for the variety fruit size as smaller sized tomatoes do better here and check to see the maturation time and ensure you will have time to enjoy your fruit!
When to plant in Southern Arizona
Tomatoes thrive in temperatures between 50°F and 90°F. Springtime in Southern Arizona, between mid-March and late June is the main growing period for tomatoes. A shorter second growing period occurs in autumn between September, when cooler weather arrives in the region, until late November, when the first frost can kill the plants. Be sure to check the local average temperatures to gauge the growing season or call your local Master Gardener program.
Spring planting
Get an early start on your tomatoes by planting seeds indoors or in a greenhouse in January, six weeks before the last frost. This option gives the home gardener access to a greater selection of varieties.
When planting out 6-inch seedling pots, start in mid-March in Southern Arizona as soon as frost damage has ended. Some retail nurseries may not offer plants mature enough to go outside in early March.
Tomato plants need overnight temperatures to be above 55°F to set fruit. Blooms will begin to form and develop once evening temperatures warm.
Choose short-season varieties (less than 70 days). Seed catalogs will list time to maturity, or days to harvest on the seed packet.
Fall planting
Poor fruit development during the heat of summer in southern Arizona (July – August) is expected. Temperatures above 90°F reduces the number of pollen grains in each tomato flower, which reduces pollen viability and fruit formation.18 Gardeners will get a second chance for healthy tomatoes in September, when summer heat has passed. There are three options for fall plants:
- In August, cut back spring plants that have become straggly to get new growth and a second crop on the old plants.
- Take cuttings of spring plants 3 weeks before desired fall planting time, put in water on a sunny windowsill. Roots will develop within 14 days and be ready to harden off and plant by 3 weeks.
- Start new seeds for September planting in June or purchase seedlings at a local garden center.
Preparing to plant
Soil health
Starting with healthy soil is crucial for a successful garden. A soil test is an effective way to understand the needs of your gardening site as you are beginning a new plot, repeating every three years to verify good soil health. Soil tests are easy and affordable. A list of testing facilities can be obtained from the University of Arizona Cooperative Extension office. Keep in mind that home soil tests are not as accurate as lab testing. An affordable, basic soil test will usually include nitrate-nitrogen, phosphorus, potassium, calcium, magnesium, and sodium, as well as pH, and EC (electrical conductivity).15
Healthy soil is essential for establishing strong tomato seedlings. Good soil preparation will assist in the growth of deep-root systems, which the plant needs for adequate water and nutrition throughout the season. Encourage rapid growth by preparing the soil in February ahead of planting your seedlings. Soil fertility should be moderately high, but not out of balance with too much nitrogen, which can burn delicate roots and slow plant growth. Amending with too much nitrogen reduces fruit production and makes for lush leaf growth. Generally, a plant well-fertilized early in its life will not need to be fertilized after the first fruit is set.
At planting, water each seedling with one pint of an ammonium phosphate solution (1 tablespoon ammonium phosphate per gallon of water). Phosphorus is crucial for fueling chemical reactions during the plant’s lifecycle. When adding phosphorus to crop plants, it should be applied at the root zone, where it will be most available to the plant for uptake.
Site selection
Select a warm, sheltered part of the garden for tomato seedlings; planting in a location that is too hot, with no relief from direct summer sun will make your plants more susceptible to curly top and sunburn. The vector for curly top is the leaf hopper. These pests thrive in direct sun more often than shade, as well as areas with bare ground. Providing adequate mulch and covering with a shade cloth of 40-60% can discourage leafhoppers and prevent sunburn. Skip pruning tomatoes in the low desert; leaves provide necessary shade for the fruits. Close planting allows the plants to shade themselves.
Spacing
If planting in ground, space rows about 2’ apart, and plants 18” to 24” apart in the row.
Plant shelter and support
Tomato cages can be used for support and shelter. Clear plastic can be attached to the cage in the cool, early days of the season, for a greenhouse effect, until the weather warms. This plastic can be removed, leaving the cage for support to the growing plant. A cardboard box can supply an inexpensive shelter from cold temperatures also.
Row Covers can be used to protect plants from seasonal frosts and to get an early start in the spring or extend the season in the fall. A floating row cover is often referred to as a frost blanket or a frost cloth. A row cover is called “floating” because it can either lay right on top of plants or put on a frame above the plants. It is made of a lightweight fabric available in several weights that can raise the temperature underneath it by 2° – 10° F higher than the ambient temperature. Once it is installed, it does not need to be removed until risk of frost has passed; water, air, and light are able to penetrate the material.
An old sheet can be used for short-term frost protection, however, it isn’t as permeable as a purchased frost cloth, so should be removed periodically for proper ventilation, moisture, and sun exposure.
Providing good support is an important strategy for disease control. Keep the leaves and fruit off the ground but allow the plant to bush out. A good support can be made by encircling the plant with a cylinder of construction wire 3’ or 4’ tall and 2’ or 3’ across. The branches grow through and are supported by the 6” squares. Purchased supports such as tomato cages or stakes are also effective. Shade cloth can be draped over the frame to give shade and discourage leaf hopper infestations.
Planting in the garden
After choosing the site and performing an initial soil test, follow the recommendations given in the test report. If amendments are necessary, work them into the top 6” of soil. If adding compost, apply 2” to 3” of well-composted organic matter per 100 square feet a month before planting, working it into the top layer of garden soil. These improvements will ensure the soil has good water-holding capacity, nutrient density, drainage, and aeration. Building and maintaining rich, healthy soil is crucial for growing healthy, productive plants.
A small amount of worm castings can be added to the bottom of every planting hole. Worm castings are a microbially-active amendment that can give plants a boost, improve soil structure, and increase moisture retention13. Worm castings can be purchased or obtained from a worm compost bin.
Deep planting (up to the first set of true leaves) or side planting will allow for greater root development and more robust plants. (Figure 1).
Tomatoes can be grown in containers, such as five-gallon buckets or grow bags. This gives some seasonal flexibility by allowing containers to be moved into shade in hot summer months and to a more sheltered area in winter (Figure 2).

Figure 1: Illustration of deep and side planting.
Evan Adams

Figure 2: Illustration of tomatoes in a grow bag.
Evan Adams
Irrigation
Watering every 3 or 4 days is better than daily light watering. The frequency of irrigation should depend on soil type; sandy soils dry out rapidly and need near daily water, while clay soils hold moisture for up to a week. Keep soil at the base of plants moist, but not wet. Using a soil probe or digging down 6 inches to the root zone to check moisture is a good way to assess water needs.
Tomato roots are likely eighteen inches below the soil surface. Longer irrigation times will allow water to penetrate to this depth, encourage deeper root development, and wash away salt accumulation that may have occurred.
In summer, a good mulch around, but not touching, the base of the plant keeps the soil and roots moist and cool. Consistent soil moisture is necessary for good fruit production.
Pollinators, intercropping and crop rotation
Tomatoes have perfect flowers, which means that a tomato has a female-stigma and male-stamen on each bloom to self-pollinate. Any motion, such as wind, insects, and other vibration can shake the pollen from one part to the other within each flower. Solitary bees and bumblebees can provide this necessary vibration through "buzz" pollination; landing on the flower and vibrating it through wing beats to trigger full pollen release.
Growing two or more crops in the same row or bed is a good strategy for diversifying host plant population to reduce pest problems. Planting flowering plants that attract beneficial insects provides biological controls of pest insects.
Rotating tomatoes in the garden each season can be an effective way to prevent disease and pests. Move tomatoes to different sites if possible, or plant tomatoes in different areas of the available planting space.
Diseases

Figure 3: "Beet curly top virus geminiviridae common bean.jpg" by Howard F. Schwartz, Colorado State University, Bugwood.org is licensed under CC BY 3.0.
Facts: The beet leafhopper (BLH) insect (Figure 10) carries Beet Curly Top Virus (BCTV) and infects plants when feeding on them. Host plants include Lambs quarter, Halogeten, Russian thistle (Tumbleweed) Greasewood, and Atriplex (Four Wing Saltbush).
Symptoms: Young plants usually killed by infection. Older plants become yellowed and have stunted growth. Leaves become dull, thick, crispy, and roll.
Management: Chemical control not recommended as a treatment. Infected plants will not recover and should be destroyed. Prevention strategies include integrated pest management (IPM), row covers and mulch (leafhoppers like to feed on plants that border bare soil areas). Practice weed control

Figure 4: "Tomatoes with Fusarium Wilt 2013" by F. D. Richards is licensed under CC BY-SA 2.0.
Facts: Caused by Fusarium oxysporum, it is a soilborne fungus in warm, wet conditions that can occur in most soil types. Survives multiple years in the soil, plant residue, in soil debris on greenhouse benches, and equipment
Symptoms: Wilting several weeks after infection. Wilting can occur on just a portion of the host. Initially, plants may recover during the evening. Permanent wilting occurs with time and high temperatures, followed by plant death.
Management: Diagnose by removing the plant and cutting a cross-section of the stem near the base of the plant. Vascular tissue will have brown discoloration. Cannot distinguish between Fusarium and Verticillium. There is not treatment. The infected plant should be destroyed and do not compost it. To help prevent, rotate crops and sterilize and disinfect equipment.
This is extremely uncommon. It is helpful to mention it because it is pertinent to tomatoes designated with V.F.N. in their names. This fungus is what the "V” refers to.
Facts: Caused by Verticillium dahliae or V. alboatrum.Fungus prefers warm, wet conditions that can occur in most soil types and can survive several years in the soil. It infects plants through intact or damaged roots and can be distributed in infected transplants, seeds, or tubers. Easily introduced to new fields by irrigation water, decayed plant material, soil particles, tools.
Symptoms: Initially, lower foliage becomes chlorotic and dies. Decreased photosynthesis reduces fruit quality. Plants wilt completely and die in severe infection. Vascular tissue will be dark and discolored.
Management: To diagnose, remove the plant, cut the stem near the base. Vascular tissue will have brown discoloration. Cannot distinguish between Fusarium and Verticillium. There is no treatment, meaning plants will not recover and should be destroyed. Rotate crops to prevent fungi from building up in the soil.Sterilize pots, trays, and tools and disinfect greenhouses. Remove and dispose of plant residues at the end of season and do not compost.
Pests

Figure 9: A group of potato aphids attacking a plant. Photo by David Voegtlin, University of Illinois.
Facts: Small, soft-bodied insects that suck sap from plant tissues on underside of leaves, such as potato aphids (Figure 9). They are common during spring and summer.
Symptoms: Stunt plants and can spread plant viruses. They produce honeydew, a sugary substance which can cover plant surfaces.
Management: Monitor plants often. Integrated pest management practices include using lady beetles, lacewings, and syrphid flies. You can also spray with insecticidal soap, horticultural oil, or strong sprays of water. remove and destroy infected plants.

Figure 10: Adult beet leafhopper. Photo from University of Idaho Extension
Facts: Common in early summer, adults are about 3 mm long, wedge-shaped, and vary in color—typically green, grey, or tan. They jump when disturbed. Adults overwinter on weeds in the mustard family and migrate on spring winds. Multiple generations can occur during a single growing season.
Symptoms: Their piercing-sucking feeding habit causes speckling on leaf surface. Direct feeding damage is not a big concern on tomatoes, but they can spread beet curly top virus, which is fatal to the plant.
Management: Use floating row covers and shade cloth to reduce access and monitor the field using yellow sticky cards. Control leafhoppers early when young plants are more susceptible to the virus they spread. Destroy and remove plant debris if you suspect leafhoppers.
Facts: Larva of the five-spotted hawk moth and Carolina sphinx moth. Caterpillars eat leaves, stems, blossoms, and fruits of host plants. Grow up to 4 inches long, green with
white markings, with a spine on the end of the abdomen.
Symptoms: Chewed leaves and defoliation, beginning from the top of the plant downward.
Management: Monitor in early July in morning or evening. Look for chewed or missing leaves, and holes in the fruit. Dark frass (excrement) on and around the plant is visible if hornworms are present. Hand-removal is the most effective control in the home garden. Organic products such as Bacilus thuringiensis kurstaki (BTk) or spinosad work on larvae. Integrated pest management approaches include lady beetles and green lacewings prey on eggs. Paper wasps will feed on larvae and braconid wasps parasitizes hornworms by laying its eggs inside hornworm.
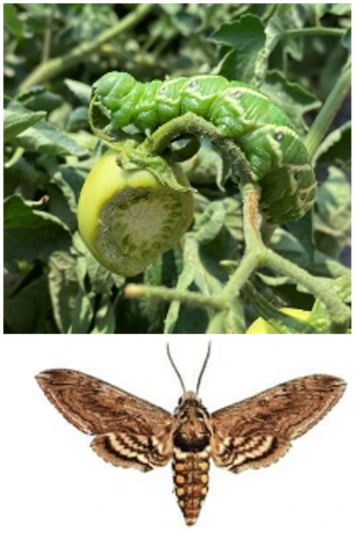
Figure 7: Larva and adult of the tomato hornworm, also known as the five-spotted hawk moth. Note the tomato hornworm has V-shaped marking on the body and a black horn. Photo from Utah State University Extension
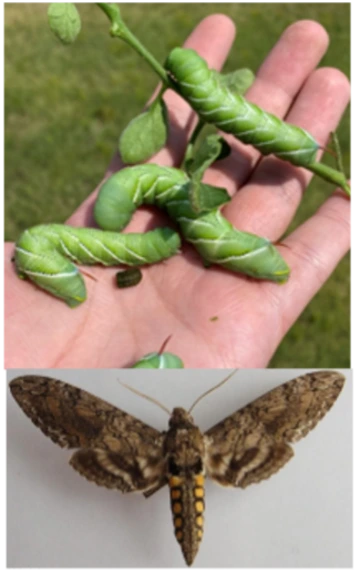
Figure 8: Larva and adult of the tobacco hornworm, Manduca sexta (L.). Note the tobacco hornworm has whitish diagonal lines on the body and a reddish horn. Photo from Utah State University Extension.

Figure 5: A larva of root-knot nematode penetrating a tomato root. Magnified 500x. Photo by William Wergin and Richard Sayre. Colorized by Stephen Ausmus.
Facts: Microscopic roundworms are sometimes considered beneficial because they parasitize soil dwelling insect larvae that damage plants, while others are serious plant pests, such as root-knot nematode (Figure 5). They can develop from egg to adult in 21 days during warm season. A microscope is needed to visualize, so diagnosis is done by observing symptoms.
Symptoms: Swellings, called galls, appear on the roots of affected plants (Figure 6). Infestations can be visualized by digging plants with symptoms and examining the roots for galls. Symptoms like wilting, loss of vigor or yellowing can appear from may to July, with additional symptom explanations available from University of Florida. Leaves also can be sparse and small and fruit production is diminished. Most common in warm, regularly irrigated, sandy soils.
Management: Very difficult to control as it can spread between sites in soil and on tools, boots, and plat debris. Use both cultural practices and chemical control measures. Treat by fallowing the planting area, crop rotation, or solarization to reduce nematodes in the top layer of soil. Increasing soil's water holding capacity will reduce nematode damage. Organic amendments,
such as compost and manure, more frequent irrigation can help reduce the damage. Companion planting with some varieties of French marigolds.
Fruit disorders

Figure 11: "DSC05447 blossom end rot calcium deficiency" by Plant pests and diseases is marked with CC0 1.0.
Symptoms: A non-parasitic disease caused by calcium deficiency which can be brought on by poor water management, drought stress, or soil imbalances. The flower end of fruits becomes dry and dark. Fruits are usually impacted when one-third or more grown.
Management: Avoid inconsistent soil moisture by using infrequent, deep irrigation and mulch to retain moisture. Be sure to avoid over-fertilizing and inuring roots by not using a hoe or cultivating ear the plant base.

Figure 14: Tomato Cat-facing. Photo by Kara Adams.
Symptoms: Associated with cold weather during early fruit set, fruits develop a long scar at the blossom end. Fruits can be misshapen but still edible.
Management: Protect plants from cool temperatures early in the season with cover.

Figure 13: “Tomato: Fruit cracks” by Plant pests and diseases is marked with CC0 1.0.
Symptoms: Horizontal or vertical cracking on the fruit is common with alternating periods of cool, wet weather and hot, dry weather. Fast growing plants and certain varieties are more susceptible. For tomatoes, occurs when the skin is not elastic enough to handle fast growth rate.
Management: Keep tomatoes evenly moist and do not over fertilize. Fruit is edible once the damage is removed. Smaller varieties crack less often than larger varieties.

Figure12. Cannon, C., & Murray, M. (2017). Vegetable pests of Utah. Utah State University Extension
Symptoms: Wilting can occur on just a portion of the host, but will occur several weeks after infection. Initially, plants may recover during the evening, but permanent wilting will occur with time and high temperatures, followed by plant death.
Diagnosing: Remove the plant and cut a cross-section of the stem near the base of the plant. Vascular tissue will have brown discoloration, which can't be distinguished between Fusarium and Verticillium.
Management: There is no treatment. Infected plants should be destroyed and do not compost them. Make sure to sterilize and disinfect equipment.
References
- Bergougnoux V. The history of tomato: from domestication to biopharming. Biotechnol Adv. 2014 Jan-Feb;32(1):170-89. doi: 10.1016/j.biotechadv.2013.11.003. Epub 2013 Nov 7. PMID: 24211472.s
- Colley, Micaela and Zystro, Jared. The Seed Garden. Chelsea Green Publishing. 2015
- Beecher GR. Nutrient content of tomatoes and tomato products. Proc Soc Exp Biol Med. 1998 Jun;218(2):98-100. doi: 10.3181/00379727-218-44282a. PMID: 9605204.
- Office of Dietary Supplements - Folate. Accessed August 27, 2023. https://ods.od.nih.gov/factsheets/Folate-Consumer/
- Office of Dietary Supplements - Potassium. Accessed August 27, 2023. https://ods.od.nih.gov/factsheets/Potassium-Consumer/
- Przybylska S. Lycopene – a bioactive carotenoid offering multiple health benefits: a review. Int J Food Sci Technol. 2020;55(1):11-32. doi:10.1111/ijfs.14260
- Tomato-A Natural Medicine and Its Health Benefits. Accessed August 27, 2023. https://www.phytojournal.com/vol1Issue1/3.html
- The University of Arizona Cooperative Extension. Arizona Master Gardener Manual. Arizona Legal Technologies, 2017.
- Drost, Dan, "Tomatoes in the Garden" (2020). All Current Publications. Paper 238. https://digitalcommons.usu.edu/extension_curall/238
- Volesky, N., & Murray, M. (2019). Tomato hornworm tobacco hornworm [Fact sheet]. Utah State University Extension.
- Volesky, N., Murray, M., & Nischwitz, C. (2021). Vegetable diseases of Utah [Fact sheet]. Utah State University Extension.
- Cannon, C., & Murray, M. (2017). Vegetable pests of Utah. Utah State University Extension
- Lowenfels, Jeff, and Wayne Lewis. Teaming with microbes: The organic gardener's guide to the soil food web. Timber Press, 2010.
- (2023). “Grow Lights for Starting Seeds Indoors.” University of Maryland Extension
- Walworth, James Lawrence. Soil sampling and analysis. (2011)
- Browning, Sarah J, et al. “Selecting Tomatoes for the Home Garden - University of Nebraska–Lincoln.” Institute of Agriculture and Natural Resources, Nebraska Extension Publications, 16 June 2008, extensionpublications.unl.edu/assets/html/g1864/build/g1864.htm.
- Rayburn, Lisa. “GMO-Free Seeds.” N.C. Cooperative Extension, Onslow County Center. January 2023, https://onslow.ces.ncsu.edu/gmo-free-seeds/#:~:text=For%20gardeners%2C%….
- Pressman, Etan et al. “The effect of heat stress on tomato pollen characteristics is associated with changes in carbohydrate concentration in the developing anthers.” Annals of botany vol. 90,5 (2002): 631-6. doi:10.1093/aob/mcf24
- Colley, Micaela and Zystro, Jared. The Seed Garden. Chelsea Green Publishing. 2015
- Beecher GR. Nutrient content of tomatoes and tomato products. Proc Soc Exp Biol Med. 1998 Jun;218(2):98-100. doi: 10.3181/00379727-218-44282a. PMID: 9605204.