
June: Productive Project Meetings
Focus and Fun: Setting the Course for Productive Project Meetings
Introduction
Preparing for a project meeting on any topic within our many 4-H Project Areas takes time and effort. Even if you are using a 4-H curriculum with pre-written lesson plans (and there is curriculum available for a wide range of subjects), at the very least you should read through the lesson plan (review both the leader guide and the member guide) so you can gather together the materials needed for the meeting and be familiar with the activities included.
Sometimes, even if you are using 4-H curricula, you may want to teach a lesson about some aspect of your project that isn’t included in the curriculum. In either case, advanced planning can ensure that the learning objectives stay at the forefront of activities and that the overall experience is experiential, or a Do-Reflect-Apply lesson. In this article we’ll define some terms, provide tips to find existing curriculum, explore how to set up a lesson plan, and provide some examples.
Defining our terms
Exploring the use of curriculum is easier if we share some common definitions for terms. We will define curriculum (lesson plans), the experiential model, and learning objectives. While these terms are closely related to each other, pulling them apart helps to figure out how to use them in planning a project meeting.
Curriculum is the big picture view and a lesson plan is the short-term structure for explaining the
(1) …aims, goals, and objectives; (2) subject matter; (3) learning experiences; and (4) evaluation approaches (Horton, et al.)
Experiential Model (Experiential Learning Institute; Norman; Elliott-Engel) is the process of learning through experience, followed by reflecting on that experience, and then applying what was learned in the future.
- Do: Experience and perform tasks and activities.
- Reflect: Make observations about the experience. Share the observations with others. Analyze the experience and observations.
- Apply: Connect the observations and experiences to other examples in life. Figure out how to use that analysis to understand or influence other experiences or situations.
Learning objectives: What the learner will gain by way of knowledge or demonstrable skill from doing the activity. Objectives may be related to the subject matter, skills to be learned, or to the process of learning.
Finding curriculum and lesson plans
Curriculum that uses the Experiential Learning Model can be found at 4-H At Home or 4-H Curriculum on the National 4-H Council website. Additionally, many examples are available from other states and counties - just search for 4-H and the name of the subject to find the topic of interest. Be sure to search for 4-H lesson plans since they will already incorporate experiential learning. You can use national or other 4-H lesson plans as presented. These curricula include ideas for games, outlines for project meetings, and even activities that help emphasize science principles and other topics to be taught.
But what do you do if you want to teach your 4-H members about something that isn’t in the curriculum you have? In that case you’ll need some guidance on how to go about creating a lesson plan. A good lesson plan includes the basic information you need to make the plan work. Here’s a sample template you could use:
|
Learning Objective(s): What participants will learn by participating in this activity including potential subject matter goals and processing goals |
|||
|
|
Description of activity |
Time needed |
Resources needed |
|
DO |
Step-by-step guide for helping youth engage with subject matter. |
Time it will take to accomplish |
Tools, materials, space, etc. required |
|
REFLECT |
The questions you will ask to help youth think about what they just did. The actions will you ask them to take. |
Time it will take to accomplish |
Tools, materials, space, etc. required |
|
APPLY |
Instructions for a new activity that will allow youth to use their new knowledge in a slightly or completely different way. |
Time it will take to accomplish |
Tools, materials, space, etc. required |
Making lesson plans: figuring out and creating the DO activities
Creating your own lesson plan begins with a consideration of the audience. Think about the age and experience of the members in the project group, as well as what they want and need to learn to make progress. Often the youth don’t have very clear ideas on what they want to learn, at least not until they have been in the project for a couple of years. When dealing with younger members and those new to the project, start with the most basic skills they need to know. These skills are the foundation that the project and the learning will build on in the future. Keep in mind the basic Do-Reflect-Apply structure of the experiential learning model as you design. Suggestions for activities to use are in the section "Teaching Tools" below.
Here is our first example from a project leader.
A beginning sewer needs to learn about the basic pieces of equipment, their parts, what they do, and how to use them. So, the starting activities could focus on two major pieces of equipment, scissors and sewing machines.
Scissors come in different types. The lesson could show the basic scissor structure and use that information to talk about the differences between scissors used to cut paper and dressmaker shears, pinking shears, and embroidery scissors. (See the sample lesson plan below for details.)
Beginners also need to learn how their sewing machine works – how fast and slow it goes, how to control the speed, how to pivot at a corner vs. how to make a slow curve, etc. Start by having youth sew different kinds of lines on paper without any thread in the machine. With practice they become confident in their ability to use this new piece of machinery. Add thread and scrap fabric and repeat the exercises. They also need to learn the parts of their sewing machine – be able to name the parts and know what each part does. Then demonstrate how to properly thread the machine, wind a bobbin, clean the machine, etc.
Sample Lesson plan on Scissors
|
Learning Objective(s):
|
|||
|
|
Description of activity |
Time needed |
Resources needed |
|
DO |
Show regular scissors
Show dressmaker shears
Show pinking shears
Embroidery scissors
|
15 minutes |
Regular scissors Pinking shears Dressmaker shears Embroidery scissors
|
|
REFLECT |
|
15 minutes |
Regular scissors Pinking shears Dressmaker shears Embroidery scissors |
|
APPLY |
Now let’s apply what we learned about different types of scissors, which are a type of tool, to different types of spoons which are also tools. What different uses might these items have? |
15 minutes |
Slotted spoon Grapefruit spoon Wooden spoon Measuring spoon Teaspoon Serving spoon Iced tea/parfait spoon |
Observing and processing information -- REFLECT
Helping youth to think about and make observations about the activities is the next step – Reflect. Making these activities fun is critical and can be challenging. Coming up with a game such as a word search, matching quiz, picture to label, etc. helps youth to think about the activity, realize what they have learned, and be able to explain it. Explaining it to each other or to parents is a great way to build in repetition of the information, which is a key principle of teaching and learning. Using the new information multiple times and in a variety of ways increases the potential for storing the information so it can be recalled. All of these kinds of activities reinforce what has been learned. They help youth to think about the process of learning and explore the best ways for them to incorporate new information into their understanding of a topic.
APPLY: the final step in the experiential learning process
Asking youth to take the information they have learned and apply it in another setting or from a different perspective is a great way to reinforce the knowledge and allows youth to think about how it fits into the rest of the world they live in. You don’t have to find a completely different topic for application; it could be something related. For example, with the beginning sewers, you could help youth apply what was learned about different types of scissors by giving them different types of materials to cut (fabric, paper, etc.) and ask which type of scissor would work best. Now, instead of looking at the tool and figuring out what it’s used for, the member is looking at the material to be cut and deciding which scissor would work best based on what they learned about scissors.
Teaching tools
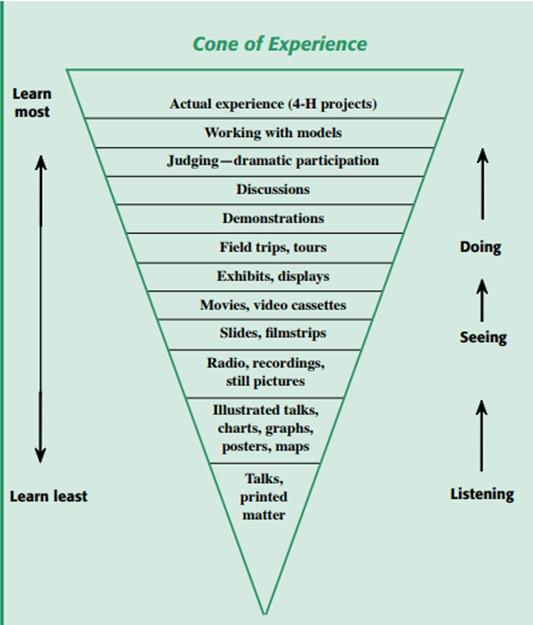
Using a variety of teaching tools can help keep meetings and lessons interesting and reinforce learning for project members. Each learning tool supports learning in its own way, and since everyone has their own learning style mixing it up will help all your members succeed. In general, most people learn best by doing, but other methods work for those with different learning styles. Demonstrations (by older youth, you, or on video) can provide information on a variety of topics and allow youth to “show” what they have learned. Judging provides similar value -- youth can say “I know these criteria, and I can recognize them when they show up.” Record keeping allows youth to explain their project, think about what they have learned, and make plans for next year based on changes they want to see in next year’s project. These are just a few of the tools available for helping youth learn. Engagement in their project, judging projects based on what they know, and demonstrations of what they know are ways in which youth gain the most knowledge. But field trips, videos, and exhibits can reinforce knowledge already gained or spark interest in new areas. Figure 1 shows a variety of activities and the impact they tend to have on learning. Explanations of the various teaching tools is available in the publication Active Teaching - Active Learning. The figure below provides examples of different teaching tools and how they contribute to learning.
Another example
Another example can be found in the 4-H Bread project: The national project book has science experiments that are quick and easy to do but help make learning about the different leavening agents easy to understand. Members like to be engaged in a variety of ways, and this do-to-learn activity is perfect for encouraging engagement. After completing and discussing the results of the science experiment, we next learned about the history of pretzels. Using the passage provided, each member read a paragraph aloud and then pointed out what they learned. We all learned something we didn’t already know.
After doing the science work and reading the history, we made pretzel dough, and each member helped measure and add different ingredients. Once the dough was ready each member got a portion of the dough to roll out and form into pretzels. When the pretzels were proofed, we were ready to dip them into boiling water with baking soda for a few seconds before putting them in the oven to bake.
While the pretzels were baking, we reviewed what we had done and learned during the meeting. This reflection is part of the experiential learning model that is included in all project curricula and an important part of the lesson – it is key for helping members recall what was important in the meeting. Again, I try to make this part fun and it’s a great opportunity to test their knowledge and whether I did a good job with the lesson.
Notice the variety of activities to help youth explore, experiment, think about, and share information about the content of the project.
Conclusion
The success of your project meeting relies on taking time for planning - whether you’re using curricula that already has everything mapped out or designing your own lesson plan. Members (and parents) like to be actively engaged in learning, so be sure you’re using all three elements of the Experiential Learning Model (Do-Reflect-Apply) when planning your meetings. This way you’ll capture the interest and imagination of the youth, keep them engaged, build both knowledge and skill, and everyone will have some fun along the way.
References
Elliott-Engel, Jeremy. Turning 4-H Project Experience into Mastery: Do. Reflect. Apply. Arizona 4-H Monthly Volunteer Newsletter, April 2021. https://extension.arizona.edu/turning-4-h-project-experience-mastery-do-reflect-apply
Experiential Learning Institute. https://experientiallearninginstitute.org/resources/what-is-experiential-learning/
Horton, Robert L.; Suzanne Hutchison; Susan J. Barkman; Krisanna Machtmes; Hannah Myers. The Ohio State University Purdue University. 1999. Developing Experientially Based 4-H Curriculum Materials. https://www.ohio4h.org/sites/ohio4h/files/d6/files/4-H%20897%20Developing%20Experientially%20Based%204-H%20Curriculum%20Materials.pdf
National 4-H Council. https://4-H.org/.
Norman, M. N., & Jordan, J. C. (n.d.). Using an Experiential Model in 4-H. (4-H S FS101.10). University of Florida, IFAS Extension. http://florida4h.org/clubs/files/101.10_Using_Experiential_Learning_Mode....
Oregon State University Extension Service. (2005). Active Teaching - Active Learning. Teaching Techniques and Tools. https://catalog.extension.oregonstate.edu/sites/catalog/files/project/pdf/4-h0259l.pdf